DIY Rustic Wall Storage Bins
Add storage to your entryway, mudroom, or closet with these rustic wood wall storage bins, built from just 3 boards using a jigsaw, hammer, and nails.
For more small-space storage solutions: build storage between the studs, a tall narrow shoe cubby shelf, or a folding desk with storage.

Speaking of creating storage… for a while now I have been talking to my husband about building a storage bin for the back of our entry closet door. Something that I can organize baby socks, shoes and hats in… not to mention all the other randoms that we need to keep in the front closet.
(I am SO sick of running up stairs to my girls rooms for socks, since neither of them will leave socks on to save their laundry drowning mother’s life.)
So, I decided to keep all their shoes and socks downstairs in the front closet. But I have only had an old Easter shoe basket to put both girls shoes and sock in… needless to say it has been bugging me.
I have seen organizer’s like this, but while it is functional, it is not exactly beautiful, and I can’t help it, I have a thing for function and beauty…
So I started looking for inspiration to check against the ideas that were growing in my brain. I knew I wanted the bins to not just be square, I wanted an angled bin to add some interest… and when I saw this and it totally was what I was thinking of… almost, I knew it was the right way to go.
I also loved this because the cabinet below was a knock of of a chicken coop nests.. and we love chickens! (sorry no sources for the images I found them a while ago, and can’t remember where)
And here is what we came up with:
Okay, so I know I said I was going to put it on the back of the door, and I had planned on it, but then, I loved it to much to not see it more often, so it took the place of my rustic art in the entry.
How to Build Wall Storage Bins
Want a printable version of this tutorial?
Join our email list here, and we’ll send a printable (ad-free!) PDF of this tutorial right to your inbox. Email subscribers also get exclusive discounts on the plans and printables in the shop — and you can unsubscribe any time.
Detailed printable diagrams coming soon to the shop!
These steps and measurements are the ones that I used. These may be modified slightly depending on your needs and wants.
Time Required: Half a day
- Prepping stain mixture: 15 min. ( 24 hours before staining)
- Cutting and Sanding: 2 hrs.
- Staining: 20 min.
- Assembly: 30 min.
- Painting Stencil: 20 min.
- Hang in place: 10 min.
Supplies Needed:
- (3) Pine Board @ 1 x 6 x 10, (actual size, 3/4” x 5 1\2” x 10’, $9.57 each
- for (2) sides and (6) fronts
- (2) Pine Board @ 1 x 4 x 10, (actual size, 3/4” x 3 1\2” x 10’, $10.72 each
- for (6) bottom of bins and (1) top
- Jig Saw or hand saw
- Hammer
- (26) Nails 1 1\4” (found in the garage)
- Sanding block or electric sander
- 100 or 120 grit sand paper
- Pencil
- Straight edge (for laying out the pattern to be cut
- Measuring tape
- Framing triangle (optional, but very useful)
- Wood stain recipe (tutorial here)
- Fine steel wool
- Vinegar
- Glass jar
- Black Tea
- Bowl for black tea
- Foam brush
- Rag

Step-by-Step Wall Storage Bins Tutorial
Step 1: Cut Pieces
Cut List:
(Quantity) Length x Width x Thickness
- Top: (1) 14 1\2” x 3 1\2” x 3\4”
- Sides: (2) 66” x 5 1\2” x 3\4”
- Fronts: (6) 16” x 5 1\2” x 3\4”
- Bottoms: (6) 14 1\2” x 3 1\2” x 3\4”
- Back Supports: (2) 14 1\2” x 5 1\2” x 3\4”
Step 2: Layout pattern on (2) sides.
Divide the sides with a mark on the front at 11” all the way up the front of the board.
-
- draw a faint line across the board using your triangle.
- mark on the line 3 1\2” from the back of the side on the line just drawn.
-
- on the front edge of the side, draw a mark 5 1\8” above the 11” line.
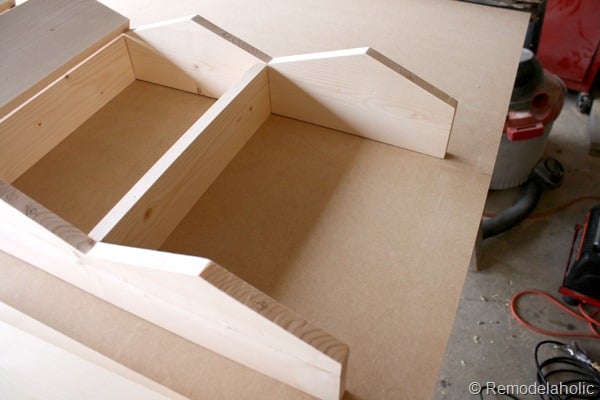
- Draw a line using a straight edge connecting the 3 1\2” mark to the 5 1\8” mark. (This line should be about 5 1\2” long for the front piece to be nailed to.
-
- Draw another line from the 5 1\8” mark back to the 3 1\2” mark above on the next line.
-
- This completes the pattern to be cut.
-
- Do some test cuts to get familiar with cutting with the jig saw. It’s ease to get the angled cuts if you are not careful.
- Cut out pattern with jig saw
- Be sure to keep the blade straight at all times.
- Cut out the little triangular pieces keeping the blade on the cut side of the line.
- Clamp sides together and sand the cut edges flat, for the front pieces to be nailed to and for the exposed edges to look nicer.
- Sand off or erase pence marks and do any last sanding touchups.
- Test how everything fits together
-
- Distress the cut pieces of wood
- Apply on layer of tea stain, and allow to dry. You won’t notice much of a difference (maybe you should, but I didn’t)
- Stain the wood using the homemade mixture of vinegar and steel wool (that has been sitting for 24 hours), see the tutorial here, before assembling.
- Assemble the minions cut pieces with nails.
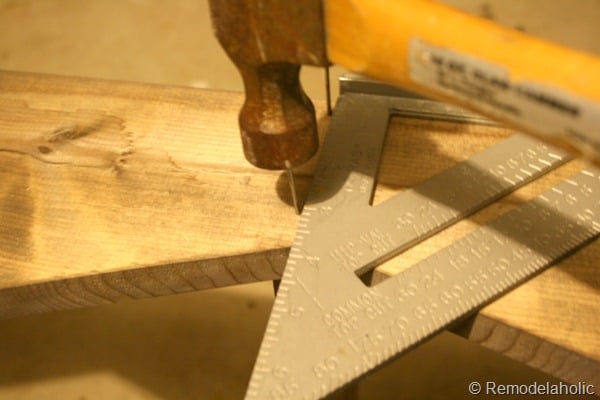
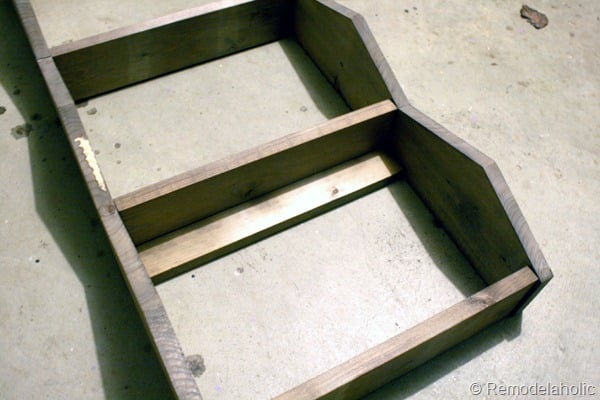
- Nail the sides to the top and bottom pieces with two nails on each side (using your triangle as a guide to keep it square. We used nails with heads to add another detail.
 |
 |
 |
 |
-
- Nail the back supports to the sides. One at the back top of the top bin and one on the back top of the bottom bin.
-
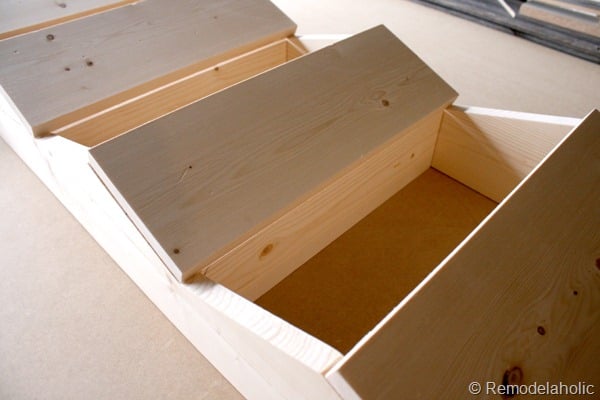
- Nail the fronts to the angled 5 1\2” sides. Again we used small nails with heads so that you would see the nails on purpose to add a tiny bit more rustic detail. At first we only had two nails, but decided to add a third…
 |
 |
 |
 |
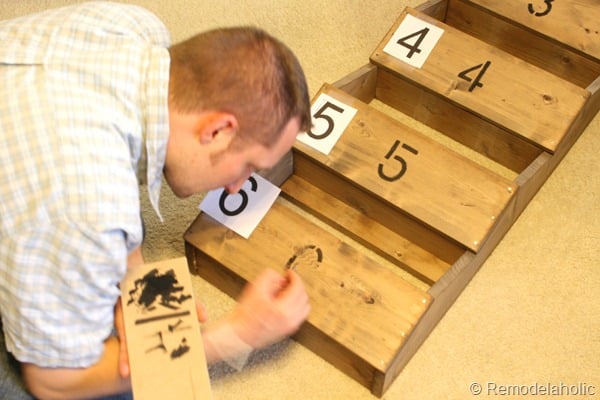
- We chose to stencil some numbers on (this is optional…) To create a cheap stencil, I printed the numbers I needed in the right size. Then we decided where we wanted breaks, and I made a few tweaks to the lettering.
- Tape the letters in place. Then with a ball point pen, Justin trace the outline of each number onto the wood. Because the wood is soft, the pressure through the paper will leave a small mark or groove to follow when painting but that isn’t really visible once painted.
- Dry brush the letters on (Justin tested it out on the back… no one will ever know! (oh shoot I guess I just told you… and showed you a picture!)
 |
 |
 |
 |
Finally, hang it on the wall (we just drilled it right through the back support boards right into a stud. And fill it up with what ever you want. I like things to be functional, so while the stuff inside might not be beautiful we use it ALL the time… baby sweaters, baby shoes, socks, gloves, scarves and hats. And of course you can change it out for different seasons.
 |
 |
 |
 |
Lydia came over while I was taking pictures. I tried to get her to look through the bins but the front door was open. I asked her to get some shoes… so she bent down to get her shoes… It was cute!
Reader Build: Farmhouse Wall Storage Bins

More DIY storage for your entryway and beyond:
- Entry Table Console with Storage Cubbies
- Cabinet Door Storage Bin Plans
- Tall Narrow Shoe Cubby Shelf
- Mudroom Corner Bench and Shelf
- Wall Coat Rack with Hidden Storage
Published Feb 28 2012 // Updated Jan 28 2021
Cassity Kmetzsch started Remodelaholic after graduating from Utah State University with a degree in Interior Design. Remodelaholic is the place to share her love for knocking out walls, and building everything back up again to not only add function but beauty to her home. Together with her husband Justin, they have remodeled 6 homes and are working on a seventh. She is a mother of four amazing girls. Making a house a home is her favorite hobby.








The chicken coop is from Sundance…I have it and LOVE it!
Genius! Saw this on Pinterest. I have 2 daughters (3 and almost 1) whose bedrooms are upstairs, but I always dress them downstairs in the living room. So their socks and shoes are everywhere. And now that it’s “winter” in Texas, we have hats and gloves taking up space, too. I have the perfect spot for something like this, too. And I can imagine that once they’ve outgrown the baby stage, we could use the bins for all the little things that seem to have no place to go. Great project!!!
Julie! HA! ha! That story is so familiar and it is exactly what we used it for! (we were even in Texas…) Anywho! Good luck on the project. I Love those bins!
Do you think this would hold books well? We have been thinking of different ways to store books in the playroom and love the look of this. I was not sure if the books would be at a funny angle though with these measurement??? Found you through Pinterest and am definitely a new fan of your site!!
Kristy, the books would lean forward, you might want to keep the front of each bin flat, and then cut out the shape of a “7”. The upper line of the “7” is the bottom of the shelf…. otherwise the books might fall out… I hope that makes sense. If you make it i’d love to see some pictures!
Ok not that the bins aren’t adorable, but I’m loving that bundle of twigs next to your door! Where did you find that??
Amber, At Ikea! I got it 3 or 4 years ago, but i think they still have them!
Once again, you have given us another awesome plan! I am building this as soon as our baby gates are done! With eight kids it is always such a struggle to keep thier shoes neat and tidy! This is so perfect! Thank you both! 🙂
Sounds like you are busy, building doors, furniture and raising children!!! Sounds like super mom to me! Have fun building!
Thanks for the plans. I just used it to make my own. There is one error though and that is the there should be 7 bottoms 1×4 not a 1×6
Thanks Michelle for pointing that out. I updated the top piece to be 3 1/2″ not 5 1/2″. I am glade that you were able to build one. Let us know how it turned out.
btw here is mine https://www.flickr.com/photos/angeleyes88/10591560755/
That looks great. I think that I will build another one.
Love your shelf, I think I might try this with pallet boards giving the outside where the numbers are a different look for each shelf. Check out my pallet headboard I made, on my blogspot. Another summer project.
Judy
Thanks Judy!
This would be a great project to recyle old shipping pallets!
That’s a great idea!
Just over from Pinterest- LOVE this! I want one beside my bed for my magazines and books, one by the back door for hats, gloves, umbrellas and “returns” and on in my sewing room! Think that may be a little overkill? I can also see this in my granddaughter’s room. I love how it can be used in so many places and also adapted (fewer bins maybe) for so many different things!
We love it for the same reason! 🙂 Thanks for visiting and commenting!
I just made this yesterday and am thrilled with the results. I did the same stain as you but am wondering if you put a varnish on it afterwards?
We didn’t, but if you feel like you need it of course you can!
I built your storage unit about a year ago and finally thought I would share it with you. I LOVE it! My children make great use of it and we have had it up in our home for over a year now. Still love it as if it was the first day I put it up. Thanks for the tutorial! Here is the link if you wanted to check out my version: https://tamarasjoy.com/easy-diy-mitten-storage/ Thanks again!
Thanks for sharing, Tamara! We’ll add a photo and link so others can see yours as well.
Thanks! It really was a fun project!
I used your plans and made my own. i looked at many designs before deciding on yours. So happy I picked yours.
Here’s why:
Takes up very little space
Extremely functional
Love that it is wall mounted
Bins are just the right size for hats / mittens
Everyone has there own bin with one left over
So darn convenient
I tried your vinegar & steel wool technique. I was pleased with results and may try it on something else. For this piece I ironed color crayons. Seriously – all those crayons your kids bring home at the end of the school year – use them. I would love to share some pics.
Thanks for the love, Stacy! I’d love to see pics — you can submit them here: https://www.remodelaholic.com/share-brag-post/
Well I was going to make this, went to the store and got everything but when I got to the checkout it was $97 so I decided against it. Super bummed, it would have been super cute but not in my price range.
Don’t totally give up! Check your local Freecycle or craigslist for pallets, you could maybe even post a request for scrap lumber, or even your local neighborhood for fence sections that have blown over! It may take a little more time to collect the wood, but you could make it with reclaimed wood and save a bunch of money!!
Check with local companies that have scrap wood bins. Our company has scrap birch covered plywood scraps that would be PERFECT for this project but you’d probably have to do two shorter sets of 3 bins just butted up together. Make some calls and/or go scope out some local industrial parks to see if there any any businesses that seem like they might use lumber that you can ask if they have a scrap bin you can go through. The worst that could happen is you don’t find any but the best thing that could happen is you could make this for CHEAP!
Thanks for the tip, Sara!
Has anyone seen these shelves or something similar on etsy? My husband and I are not handy but we love supporting those who are. I cannot find anything similar from etsy, local craft page, or amazon and the retail sites.
Alyssa, I would love to make you one if you are still interested. Sorry it took so long to get back with you. The shipping might be the tricky part and how big you want it. It could add quite a bit to the price. Let me know if you are still interested.
So cool, thanks for posting! Does this work for adult size shoes as well?
Yes it can!
Would I need to modify it for adult shoes? Like use 1×8 or 1×10’s. Would that change the cuts? How?
Hi Starla,
That depends on what kind of adult shoes you want to store. Narrower and shorter shoes in smaller sizes would likely fit, but for larger and taller shoes, you’d probably want to change up the size. You could keep the angles the same but use a wider board on the sides to make it deeper, and you could also make the bins wider to fit the shoes you need without changing the angles. I would use a couple of scrap boards or even cardboard to cut a test single bin and see how your shoes fit, and then you can decide if it will fit what you need.