Build An Easy Patio Set with Benches and a Coffee Table
Remember the Easy Barn Wood Frame from An Old Picture Frame we made? Today we are having woodworking fun again!
We are building a super easy patio set inspired by a photo we found on Pinterest! (And we have searched but we cannot determine the original source, so if you know, please let us know so we can credit it properly!)
This set consists of two nice comfy benches and a coffee table! They are not only easy to build, but also reconfigurable. Feel free to modify the length of the benches, and the dimensions of the coffee table to your unique space!
How to Build an Easy Patio Set with a Bench and Coffee Table
Materials and tools:
- 2x8s (actually 1.5″x7.5″) for the aprons of the benches, you can also use 2x6s
- 2x6s (actually 1.5″x5.5″) for the aprons of the table, and the legs of the benches
- 2x4s (actually 1.5″x3.5″) for everything else
- pocket hole jig and screws, plus a drill
- wood glue and wood screws. You don’t have to use wood glue, but it adds strength, so it is recommended here.
- eye goggles, hearing protection
- circular saw, jig saw or miter saw
- orbital sander or hand held sanding pad
- optional: paint, stains etc for finishing the wood
Cut List For One Bench ( 2 benches will give you the look in the photo):
- 2x8s (actually 1.5″x7.5″) for the aprons of a bench: (2) @ 13.5″ long, (2) @ 42″ long
- 2x6s (actually 1.5″x5.5″) for the legs of a bench: (8) @ 14.5″ long
- 2x4s (actually 1.5″x3.5″) – (5) @ 23″ long, (7) @ 56″ long
Cut List For One Table:
- 2x6s (actually 1.5″x5.5″) for the aprons of the table: (2) @ 29″ long, (2) @ 21.5″ long
- 2x4s (actually 1.5″x3.5″) : (4) @ 16″ long, (4) @ 21.5″ long, (7) @ 36″ long
Building the Bench
We will start with the bench step by step.
Step 1:
Cut the taper on all of the legs (2×6) with a straight cut with either a jigsaw or circular saw.
Join two piece together with wood glue and pocket hole screws. Keep them as square as possible.
Step 2:
Attach the side aprons to the legs using wood glue and pocket hole screws. Check for squares again by measuring the diagonals of the bench top. The 2 measurements should be equal. ( To be honest, I have gotten away with things not being perfectly square. Just do your best!)
Another option is to use 2x4s to join legs and aprons together. The 2x4s should be 1.5″ below the top of the legs and aprons for the supports in our next step.
Step 3:
Add supports (2x4s) spaced at 8″ to 12″ on center with wood glue and pocket hole screws.
Step 4:
The top of the bench are 2x4s screwed from underside to the support pieces with wood screws.
That’s it for our bench! It’s 16″ high, which is comfortable for sitting as is, or with a nice thick cushion!
Building the Coffee Table
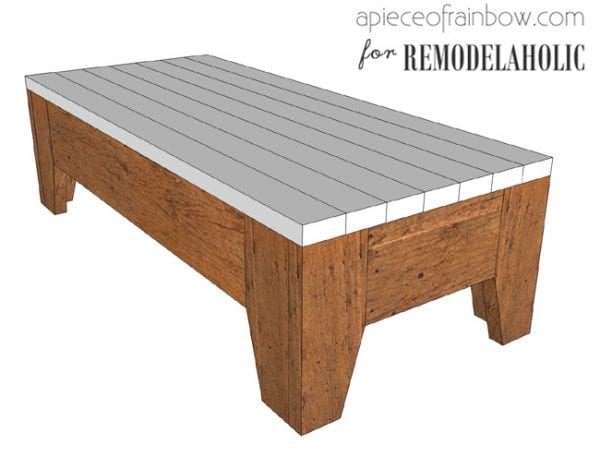
The coffee table is built in the same way as the benches.
The only difference is in the dimensions. The finished table is 17.5″ high. The aprons are made from 2x6s, and each leg is made from a piece of 2×4 for a lighter look.
After a bit of sanding, you can leave the wood natural or finish them with paint or stain.
When two benches are arranged together in and L shape, we have the configuration of the space like in our inspiration photo here.
You must be wondering where to find all the pretty pillows? You can easily make the top cushions with foam and fabric. We also have a fabulous guide all about pillows for you!
Now you have just created a lovely outdoor room, it’s time to enjoy a fun book or some great company!
Before I say good bye, here are a couple of easy and fun wood working projects to try:
Make some scrap wood wall hanging art with free vintage seed packet printables-
How to make your own stencil and create stenciled pallet floor mat
Or these simple pallet crates inspired by vintage orchard crates!
 |
 |
 |
Happy creating!
——————————-
More outdoor and patio furniture to build:
(click on each photo to see the tutorial)
Ananda is an artist and garden designer. Her work in landscape architecture and art led to many creative diy ideas and projects that she shares here at Remodelaholics and at her popular blog, A Piece Of Rainbow.


For the taper on the table from the single 2×4 what is the measurement at the bottom? The ending measurement of the taper