2013 Remodelaholic In Review
Wow oh wow — am I the only one in disbelief that 2013 is coming to a close? In the spirit of New Year’s resolutions, I always think it’s fun to look back at what we HAVE done this year (instead of just what we intended to do… but didn’t). So, here’s a collection of all of the projects that Justin and I have done this year (and shared on the blog — we still have a few to share, as always… they’re coming, I promise!)
Like usual, I started out the year sharing projects from our Texas house (the Park House)… projects I’d been meaning to share for a year or more. Just say it with me now: better late than never. Right?
Park House Dining Room
Check out the small updates we made, including our bamboo blinds (and a trick for how to hang them) and the full dining room reveal.
Park House Kitchen
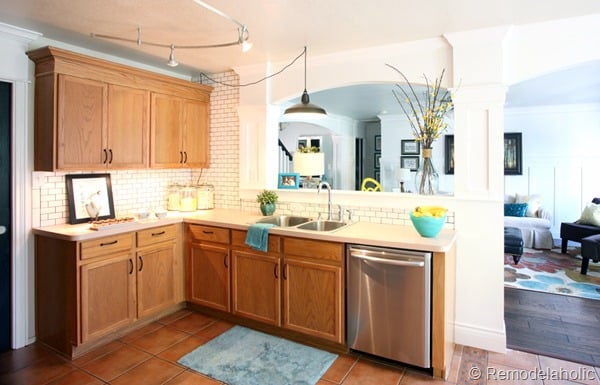
We really put some love into this kitchen. See the before pictures and then the reveal of all our hard work! We made some small updates and then we really put on our DIY to update the builder grade cabinets without painting and install (and give you a tutorial for) the white subway tile backsplash.
Etta’s Park House Bedroom
I loved this room for my little girl! Turquoise will always have a special spot in my heart (though I do love her current navy and pink room, too!). See the full girls’ bedroom reveal, and learn how to make a simple bed crown cornice and how to stencil a wall in just an hour.
Park House Entry and Stair Makeover
One of the biggest changes we made to our Park House was the entry. It started out fine, but I loved all the changes we made! And isn’t that why we DIY… to make the house we love on a budget we can live with! See the entry and staircase makeover reveal and get all the steps to redo a staircase in the staircase makeover review.
Park House Living Room
One of the rooms that you all have loved the most (according to our stats, anyway) was the living room in our Park House, once I *finally* revealed it. And I agree, it’s one of my favorites, too! (Do I say that about every room? Oh well.) See the full living room reveal and then check out our free interior column plans and the the free plans for both built-in bookshelves and built-in corner bookshelves.
And then we did eventually get around to showing you all the things that we are doing around our current house (our Canyon House). Yup, the one where are actually living right now! This summer, we did a lot of projects for the exterior and yard:
Backyard and Home Exterior
We showed you our yucky old windows and the awesome new windows that Home Depot installed for us. And then we built some inexpensive wooden shutters — for under $40 for the pair!
 |
 |
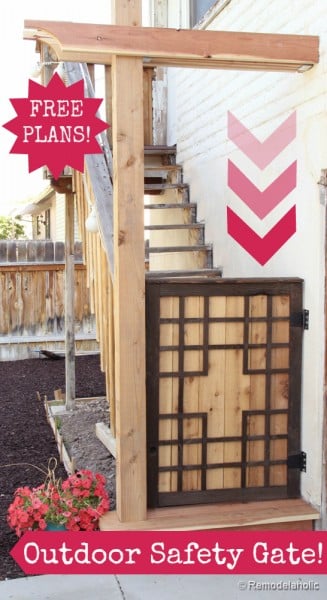
We cleaned up the yard for summer and we also built and installed an outdoor baby/safety gate to help keep our girls safe while we were working on bigger projects.
And then, following our backyard design plan, we showed you how to
install custom raised garden boxes
put in a DIY concrete patio (part one and part two of the tutorial)
how to build a DIY curved seat wall and fire pit
how we use bark mulch for weed control around our trees
and how we planted fall flowers in our new flower bed created by the seat wall.
And then inside the house, we had a lot going on too!
Living Room
 |
 |
We love our new living room flooring! It looks great with our Swedish Mora Clock (get the tutorial, part one and part two) and our new New living room chair and rug. We also installed board and batten in our living room (learn how to install it here, plus a tutorial for accurately spacing the board and batten here) and built that gray storage console table from a card table.
To finish off the room (yeah, right… like I’m ever actually finished!) we gave the DIY dutch barn door a new look with a color-washing technique and added house numbers on the stair riser.
Etta’s Pink and Navy Room
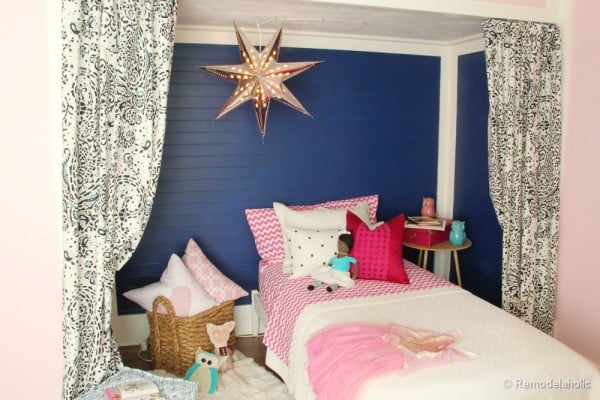
My Etta is growing up, and she is expressing her opinions on what she wants for her room. Thankfully we were able to find a compromise that we both love and create her a pink and navy room. I shared some pink and navy girl’s room ideas to get us started, and then away we went…
We found a great new rug and then just had to make it our own with a little bit of paint. We turned her closet into a fun bed nook, so then we built her a built-in closet from existing furniture. We added a few more fun decor details, like some DIY painted confetti curtains, and then we topped it all off (pun intended!) with an awesome Craftmade flower ceiling fan. Are we done? Probably not….
Master Bedroom
For as much love as we gave Etta’s room… the other bedrooms of the house were a bit neglected. I shared some of our master bedroom plans (including buying a headboard instead of DIYing it *gasp*) and we build a large wall chalkboard (which was supposed to be a mirror) with a chunky frame — and that project still has another secret to share… some day. We also transplanted our new rug from the living room into our bedroom.
Home Office
You’d think, being a full-time from-home DIY blogger that my home office would have been one of the first places that I’d have taken care of, right? Oh, so wrong. The business center of our home was sadly neglected! I took the Home Goods Happy Home Resolutions challenge, though, and we changed all that by organizing the office and installing some fabulously easy DIY rustic wall shelves. Now it’s a space that we love to work in!
Kitchen and Dining Room
Do we have a kitchen? Yes we do. Have we applied our Remodelaholic charm to it yet? No way! But we are working on it, and we will share it once we have. We did, however, put together a kitchen island/dining table for Knocktoberfest (tutorial to come!):
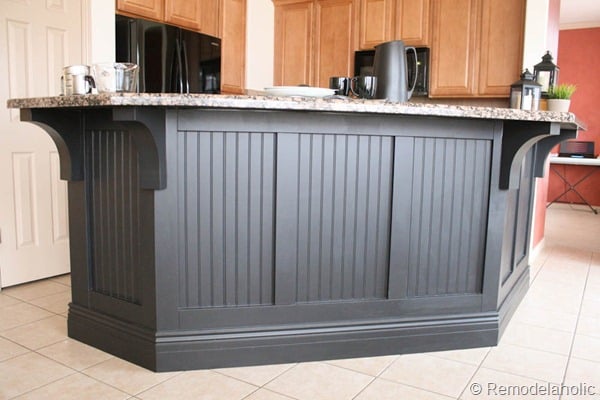
And we also did some makeover work on a friend’s kitchen island — get the tutorial, part one and part two:
Home Decor and Crafts
On the home decor and crafty front, I made a hair bow storage solution for my girls, and painted swimsuits on their Barbies:
 |
 |
I also made a few wreaths and tossed in a pillow and a quick wall art tutorial for you:

And I also made it all the way through a full 12 Days of Christmas AND a Christmas home tour. It’s a Christmas miracle 🙂

Peeps S’more Pie | JOY String Art | Snowman Wreath
Christmas Tree Advent Calendar | Easy Stocking Pattern | Faux Fur Tree Skirt
Merry and Bright Kids’ Art | Gingerbread House Templates and Tips | Christmas Photo Booth Ideas
Phew! It’s a busy year, and we have so much more to share with you in 2013. We are excited about our projects, and we are thrilled to be bringing in a fabulous team of contributors (who we’ll introduce in a couple of days!).
Happy New Year!
PS: If this was fun to see, then you should really check out past review posts: favorite projects from 2012, best project of 2011, favorite recipes of 2011, and our favorite things from 2010, top ten of 2009 and our first ever review of the year in 2008!
Lorene has been behind the scenes here at Remodelaholic for more than a decade! She believes that planning projects and actually completing them are two different hobbies, but that doesn't stop her from planning at least a dozen projects at any given time. She spends her free time creating memories with her husband and 5 kids, traveling as far as she can afford, and partaking of books in any form available.


Great Recap! I love the home office you created! I was wondering if you might have any advice for how to hang a very heavy (over 100 lbs.) mantle. We had it made from an old wagon barn beam, and we are stumped about how to hang it properly.
Nicki, it’s hard to say how to do it without more detail about where it is going and what it is hanging on. There are a lot of good fasteners it just depends on your situation.
It is going over my fireplace, and we are hanging it onto drywall. If there are any other details you need, I would be happy to provide them because I would love to have your opinion.
Nicki, I would use lag screws into the studs of the wall behind it. I did find out however a good solumtion that I had to goolge to make sure it would work well. Follow this link and try it out. good luck.
Wow! You must be exhausted!! Love your work and thanks for sharing!
It was a busy year, that’s for sure. Thanks for reading our blog!
an amazing amount of projects accomplished and stylishly. Happy 2014 to you guys!
Thanks a bunch! Happy New Year to you too!