Build a Modern Easy DIY Console Table with Shelves
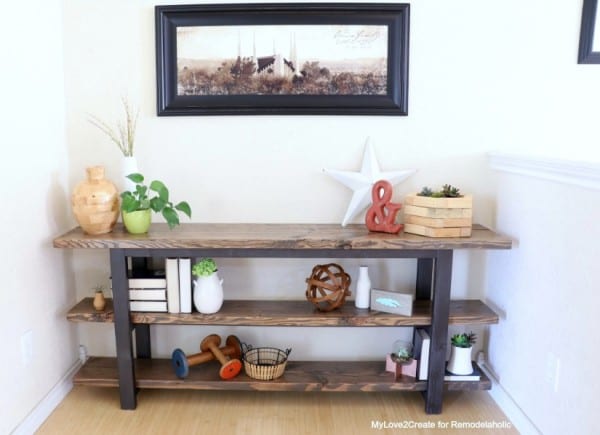
This modern Pottery Barn inspired easy DIY console table with shelves will make a great entry table or sofa table! The adjustable length makes it easy to customize to your space and finish to fit your style.
Be sure to also read our tips for picking good 2×4’s and other lumber to build with, a couple other entry ideas and also 25 console table decorating ideas.
Pottery Barn Inspired Rustic Modern DIY Console Table
Hello Remodelaholic readers! It’s Mindi from MyLove2Create.
I love building affordable furniture and decor like this $25 Farmhouse Bench and Long Hexagon Tray. Today I am going to show you how to build a Pottery Barn inspired modern rustic console table DIY!
Console tables are a great piece of furniture to have in your home. This narrow table can work as an entryway table or hallway table as a place to drop of your keys and display an inviting bit of home decor. They are great behind a sofa or couch in a living room to hold a drink. Or they work as a buffet in a dining room. Truly this amazing accent piece can be used in any area of your home!! Bonus if you need a console table DIY project, and this particular farmhouse style isn’t your cup of tea, we have links to 5 more options at the bottom of this post, so be sure to check those out.
But first, isn’t this farmhouse console table a beauty!!
You can have the high end look without the cost with this easy build, and I am super excited to show you how!
Video of How to Build the Console Table
Watch the video below to help you understand each of the building steps before you build, and get the detailed printable plans over in the Remodelaholic Shop.
How to Build an Easy DIY Console Table
Click here to see the photo tutorial over at Mylove2Create
This post contains affiliate links for your shopping convenience. Learn more and read our full disclosure policy here.
Materials List
I kept the cost of this plan down by using affordable construction grade lumber
Get the full printable materials list in the woodworking plan.
- 2×2 Wood Lumber
- 2×3 Wood Lumber
- 2×6 Wood Lumber
- 2×10 Wood Lumber
- Wood Glue
- Wood Filler (Optional, I kept it farmhouse style so decided not to fill any wood holes)
- 100 Grit Sandpaper
- 220 Grit Sandpaper
- Wood Conditioner
- Stain
- Polyurethane (Clear Coat)
- Pocket Screws
Tools List
Read these tips for picking the best, straightest lumber for your project.
There are no angled cuts in this build, so you’ll just need a:
The Kreg Jig pocket hole jig is worth the investment because it makes joinery so easy and can be used on so many projects!
You’ll also need pocket hole screws and a few wood screws. I recommend self-tapping screws to save a bit of time on pre-drilling.
And don’t forget the clamps — good clamps make every build easier. Face clamps and right angle clamps are handy for building furniture like this.
Building the Console Table
The printable woodworking plan contains all the detailed cut list, assembly instructions, diagrams and dimensions. Here are a few tips to make the project successful.
Tip 1: Cutting Wood Console Table Parts
For multiple cuts the same length, use your first cut piece to measure, mark and cut the remaining pieces of the same size (bottom left).
Tip 2: Sand Before You Build
After you cut all all your pieces, sand them to buttery smooth. It’s much easier to get a good smooth finish before the pieces are assembled, then touch up any spots that need it.
Start with 100 grit sand paper and finish off with 220 grit.
Tip 3: Use Spacers
Using cut scrap wood spacers is a great way to get secure joints in the right location, without marking as many spots to line up.
Measure one spacer instead of markings for the rails on the legs, and use a scrap board “spacer” to line up the shelf overhang, too.
Use small spacers (I used 1/4″ thick 5-gallon paint sticks) to get the shelves in the right location for final assembly.

Tip 4: Clamp Clamp Clamp
It is so important to have good clamps and a good work surface to build on!
Investing in a good set of clamps will ensure that your joins are straight and square and your furniture is sturdy.
My assembly table features a track clamp system like Justin’s table saw workbench and it’s amazing.
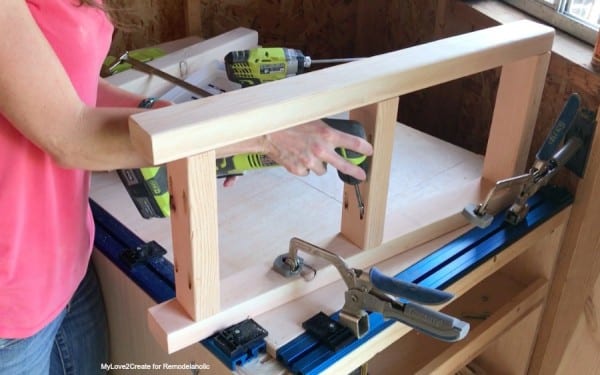
Just look at all the clamps at work here! These are face clamps but when attaching the legs to the aprons, I also like to use a right angle clamp to hold my pieces in places so they don’t shift while I drive in the screw.
Tip 5: Use a Smaller Drill
Because the console table is fairly narrow, the spacing between legs doesn’t fit a standard size drill with the pocket hole screw bit.
You can try using a standard drill bit, or, like I did here, a right angle drill (or drill attachment) to fit the tight spot. A great addition to your tool arsenal!
Tip 6: Use Self-Tapping Screws
Just like with the easy farmhouse bench, I recommend using self-tapping screws any time you aren’t using pocket hole screws. For this console table, that includes when you attach the shelves to the base (shown above in Tip 3).
If your screws are not self tapping you will need to pre-drill before you add your screws so you don’t split the wood. Self-tapping screws make me happy! 🙂
See more Easy Woodworking Plans for Beginners.
Finishing a Modern Wood Console Table
For this console table, you’ll finish the wood BEFORE you complete the assembly.
Now you may think, “Finish? But the build isn’t complete yet!” You are right, but trust me this is the best way to do it!
I did a quick dry fit with my top and shelf boards to make sure everything fit in the frame of the table and was square.
I wanted the wood to look like metal, so I spray painted the base of the console table with oil rubbed bronze to give it a metallic look.
For the shelves, I wanted my new wood to have a more “weathered” look so I did a few extra steps to accomplish that more rustic look instead of just staining like normal.
- Because I was using soft pine I used a pre wood conditioner to keep my stain from going on blotchy (top left).
- I started with a coat of weathered gray stain (top right).
- Once that dried, I beat up the wood. I took some random objects and did some banging with a hammer, pounding random things into the wood (like this beaded cord, bottom left and a screw), and used a chisel to scrap and gouge some edges. (I show a few more examples of how to get the reclaimed wood look in my Reclaimed Wood Coffee Table post.)
-
I stained the wood again with a dark walnut stain. The darker stain on top helped the “banged up” parts to stand out more giving the wood that used and reclaimed look.
-
I finished off the top board and shelves with 3 coats of poly sanding with a fine grit sand paper between coats 2 and 3.
After finishing, you’ll attach the top pieces and shelves as detailed in the printable plans and then just look at how it turns out!
You just built a beautiful DIY console table for a fraction of the inspired version’s cost!!
Plus this is a really quick build, so it doesn’t take long at all! I bought the wood and had it built before my kids got home from school. Technically I hadn’t attached the top and shelf boards yet, but the base was built and spray painted!
This is such a versatile piece too. It can be used behind a sofa, for your TV and media center, or as an entry table.
I think it would be great in a craft room too, for additional storage with labeled bins to hold craft supplies, or fabric on the bottom shelves!
Or to hold your books, plants and decor! You can see one of my DIY Hexagon Planters on the top right, it is a perfect accent for a table like this.
You can finish it with a rustic industrial look like I did here or on my Rustic Industrial Table, or use a fun colored paint and stain or your own DIY wood stain recipe…really there are so many possibilities to make it to fit your own style.
The clean lines of this console table will also look great with this farmhouse X side table for a whole set!
This is why I love DIY… Make it how you want it!
If you are looking for a console table I hope you give this build a try!
You won’t regret it, please visit me on my blog for more great DIY and craft projects for your home!
Please pin the diy project image below so you can build this sooner than later!
More DIY console tables to build:
- planked X farmhouse TV console
- adjustable length double X console
- no-nails long console table
- waterfall edge stacked plywood console table
- sliding barn door media console
First Published 04 Nov 2017 // Last Updated 07 Dec 2022
I have a great love to DIY, repurpose, and create! I am constantly seeking to make things more useful, effective, and beautiful in my home one project at a time. My projects are done in tutorial form so I can inspire others to create too!
My Blog


