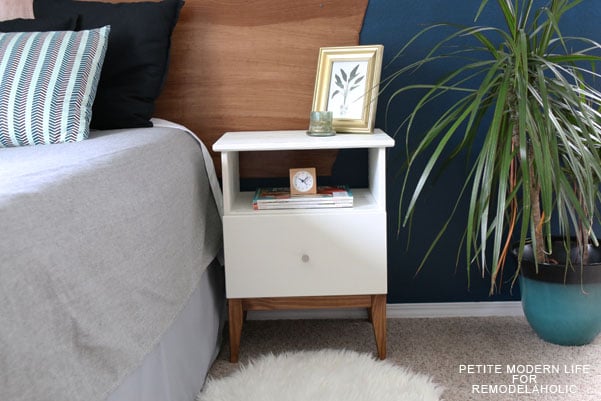
Easy Mid Century IKEA Tarva Nightstand Hack

I love this Ikea hack because all the piece are separate and easily painted before assembly! But before I get too far ahead of myself, here are the necessary items for you to accomplish this gorgeous hack.
Mid Century IKEA Tarva Nightstand Hack
by Karisa from Petite Modern Life
Materials:
- Ikea Tarva Nightstand
- White Interior Acrylic Latex Paint (love Sherwin Williams!)
- Dark Walnut Stain
- High Density Foam Roller
- Soft Stain Brush
- Drawer Pull
- Miter Saw
- Drill *helpful, but not necessary.
You might already have most of these items on your garage shelf, we did!
Hacking the Tarva Nightstand:
To start, unpackage your Ikea Tarva pieces and place on your painting surface all the large pieces, minus the legs, and four slats that go above the legs on the base of the cabinet. Check your Ikea directions to distinguish what those four look like.
Then lay your legs in the direction that they will be mounted and draw the angle at which your going to want to cut them. We decided to leave about an inch of flat foot on each bottom leg, angling it up to about four inches from the top of the leg. You can also go to the height at which the bottom slats hit the leg. Your choice. Then, using your miter saw, carefully cut your leg along the line you drew.
Take your stain and brush and do two coats of Dark Walnut. (About an 30 min- 1 hour dry time between coats).
I placed all my large pieces on a paint cloth and painted each side with two coats of white paint. With my coats being thin, I would paint one side and let it dry 1 hr before flipping it over and painting/repainting the other side.
Lastly, just follow your Ikea instructions for assembly with the option of adding your own drawer pull! I decided to use the Ikea ATTEST knob. How easy is that? Why haven’t I made these sooner?!


Thanks for reading! I hope you’re inspired to make a beautiful Ikea Tarva nightstand too! I now want all the Tarva collection to make a cute mid century room. We’ll see if the husband goes for it 😉 Come say hello and check out these other popular Petite Modern Life posts!


Tell me about that headboard!
Find it here! https://www.petitemodernlife.com/2016/03/03/diy-live-edge-headboard/
Yes where did you get the headboard?
We did this and it looks amazing. I stained the top too, so dark top and legs with white sides and drawer. We did one for each side of our bed and they look amazing for about $120 total and ~6 hours of work to prime, paint, stain, sand, poly, sand etc. Worth every saved penny.
Yay! I love hearing stories like this. I’d love to see pictures, too! https://www.remodelaholic.com/share-brag-post/
Thanks so much for taking the time to leave a comment!
Do you have any pictures?
Hi. I have two of these stands and am thinking I could take the feet off and cut and stain before putting them back on. Painting the rest white while already put together. I love how yours look but I don’t want to take both apart and then out back together. Thoughts?
Hi Sarah,
I imagine that would work and have the same finished look at Karisa’s do here. We’d love to see pictures of how they turn out!
Hi! Two questions for you. Do you know what color your walls are? That’s exactly what I’m looking for in my bathroom. Also, I love the cut legs, but I don’t have a mitre saw. Do you know if that’s something they would help with at a big box store like Home Depot?
Hi Lauren,
I bet Karisa (our fabulous contributor who shared this project) can answer your paint color question if you’ll click over to her blog and ask there — I don’t think she’s still monitoring comments here. For the cut legs, stores generally don’t make cuts like that, so you could find a friend with a miter saw or use an inexpensive miter box and saw instead. Best of luck!
Do you know if Karisa sanded and/or primed the end tables before painting them white? I’ve tried painting a Tarva dresser before and sanded/painted, but the white ended up cracking which has been frustrating given how much time I put into it. Granted, it could have been the quality of paint I used, which I can’t recall, but I don’t believe it was as quality as Sherwin Williams.
Do you have a video for cutting the tapered legs?
Unfortunately, we do not.