I Heart Pillows!
Make an adorable and easy embroidered heart pillow as a fun throw or for the holiday!
You might also like 10 DIY Pillow projects to DIY
With Valentines’ coming up I thought it would be fun to make a throw pillow. But lets be honest, I really don’t have time to make throw pillows that only get used once a year. I *should* have much more important things to do, that doesn’t always mean I do those things… uhem. But my daughter, has been asking for a pink room. (I’m thinking pink and navy!) It is happening slowly (or should I say, not happening at all) cuz Mama needs a kitchen first! So, for the time being, we are at a point where we just have to live with her room as is till we have more time to get back into the space.
When I realized it might be fun to make a Valentine pillow, I thought, that a pink pillow would go well in here to be finished room too, so I committed myself to making some cute pink pillows for my little love (and that work well in time for Valentines)! And happily she loves it!
Here is what I came up with a large scale embroidered heart pillow. It took me about 3 hours, and would have been less, if peeling the paper off didn’t take as long! (and hopefully my instructions will save you some time, since I learned how to make it easier!)
Valentine Embroidered Heart Pillow Cover Tutorial
Supplies:
| Embroidery floss | Fabric | Heart Print Out |
| Pillow Form | Straight pins | Embroidery Loop (optional) |
Instructions:
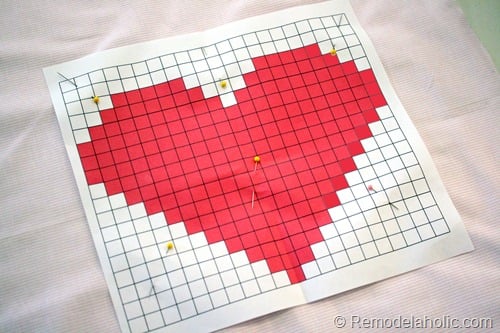
1. Print off the heart template.
2. Cut your fabric. I had 45” wide fabric. I cut a strip off the edge to 21” wide (my pillow form was a 20” pillow). So my fabric measured 21” x 45”.
3. Center the heart template on the good side of the fabric, and pin it in place.
4. Begin Embroidering. I separated my chosen embroider floss to three strings since the “x’s” were rather large. To separate the threads of embroidery floss, grab one end of a single thread and pull out, it should come right out one at a time. After removing the first one, smooth the remaining threads out before removing the next single thread. Thread your needle with the embroidery floss and begin sewing “an X” for each pink box.
To make it easier to remove the paper, I would sew an X around the edges according to the grid, but only sew half of the “x” on the interior grid (like above). This makes it easier to remove the paper, but the grid is all marked out. Carefully rip the paper away and then finish the other half of the “X” stitch. I used an embroidery loop for this part since the paper wasn’t there to support the stitches and keep them even.
Once your heart is sewn on and the paper is removed, iron all you fabric and your stitches. You can see how it made a difference, and it is going to be easier to iron now than after the pillow is sewn.
5. Finish off the end seams. Fold over 3/4 of an inch seam on the selvage edges (the two 21” long edges), good side of the fabric out and secure with a straight stitch.
6. Create the pillow envelope. Keep the heart centered and fold over the ends, good sides together. First one side then overlap the other with about a 2-3 inch overlap. Before sewing make sure your pillow is square, measuring 20” height x 21” width, with the heart centered on the front square. Pin the side seams and sew down the side, I had about a 1/2 inch seam. So my pillow ended up being 20” x 20”.
7. Flip it inside out and be sure the corners are pushed out properly! Tuck your pillow form inside and you’re done! You have a perfect embroidered heart pillow for Valentine’s Day!
Cassity Kmetzsch started Remodelaholic after graduating from Utah State University with a degree in Interior Design. Remodelaholic is the place to share her love for knocking out walls, and building everything back up again to not only add function but beauty to her home. Together with her husband Justin, they have remodeled 6 homes and are working on a seventh. She is a mother of four amazing girls. Making a house a home is her favorite hobby.


That’s so cute! Great tutorial!
Crystal, you are always so sweet! Thank you!
I really like the grid of the heart! It looks absolutely adorable! 🙂
THANK YOU! I might try it another time a little looser, it was a fun project!